Are you tired of looking up at dated ceilings? Sick of trying to clean dust and cobwebs from your textured ceiling just to get an eyeful of who knows what? Unfortunately, popcorn ceilings are found everywhere today, and we want them out of our homes! Popcorn ceilings have a bumpy textured appearance and are often called cottage cheese or acoustic ceilings.
Where Did this Popcorn Come from Anyway?
Builders and remodelers went crazy for popcorn ceilings back in the ’60s and ’70s. Applying this texture to drywall and plaster ceilings was a super quick and easy way to hide imperfections. It also helped skip some steps and save money, since it eliminates the need to paint the finished surface. But like many trends from the 1970s, the popcorn ceiling has fallen out of favor and many homeowners are removing or covering up the unsightly surface.
Step 1: Gather Up Your Tools and Materials
Fortunately, the project doesn’t require any special tools, and you may already have everything you need on hand. The essential popcorn ceiling removal tools include:
- Ladder – Use a ladder to reach high ceilings and tight corners. Have a partner stand nearby for added safety.
- Tarp – Cover your carpet, furniture and belongings to protect them from debris.
- Painter’s tape – Use to secure drop cloth or tarp along the floor.
- Plastic sheeting – Use to cover nearby walls and lighting fixtures.
- Safety gear – Protect your eyes, nose and mouth from excess dust and debris.
- Paint scraper – This is the tool used to physically remove the popcorn texture from the ceiling.
- Primer – Prime your newly uncovered ceiling before applying a fresh coat of paint.
- Paint – Paint your newly unveiled ceiling for an even color throughout your space.
Step 2: Prep the Workspace
Like most home improvement projects, you’ve got to create a big ol’ mess before things start to look better. This is especially true for removing popcorn ceilings. We always prep the space before painting, but with all that texture coming down, we have to take it a bit further. First, we remove furniture from the room and cover floors and walls with plastic sheeting. Depending on whether the walls are also getting painted or not, we may attach sheeting to walls with painter’s tape to keep them protected. Taking down ceiling fans or hanging light fixtures will also make the job easier.

You’ll also want to turn off the HVAC system and cover all the vents. Open some windows to help the air circulate. A dust mask and safety goggles are an absolute must. When all is said and done, you’ll be more than ready for a shower.
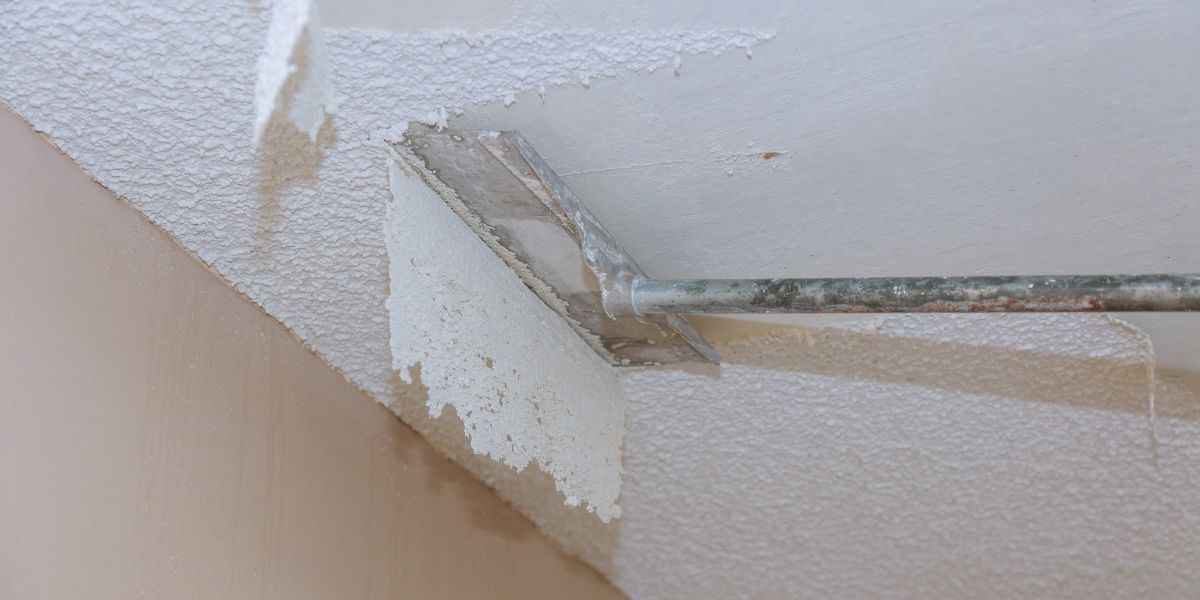
Step 3: Scrape Away the Popcorn Texture
You may scrap each section while it’s dry, but applying a bit of water often helps moisten and remove the material if the process becomes difficult. Use a wide putty knife or drywall taping knife and gently run it along the ceiling. You can also use a paint scraper paired with a handle or painter’s pole to help extend your reach. However, be careful not to gouge the ceiling underneath, so this is where a ladder really comes in handy.
For dry scraping, work in small sections of about four to six square feet. If you prefer to moisten the area, saturate a small section of the material with a bottle of warm water mixed with few drops of dishwashing soap. Apply enough to loosen the material without causing damage to the drywall underneath. Make several passes if necessary. Wait 15 to 20 minutes for the material to absorb the solution, then begin scrapping. If the material is still difficult to remove, repeat the moistening process.
Whichever method you choose, use a small putty knife to scrape corners, crown molding and extra residue. Remember to tidy the spots around fixtures that are left hanging, but be careful not to gouge the drywall or tear joint tape throughout the removal process.
Step 4: Patch the Ceiling
More than likely, you’ll need to patch some areas of drywall after the texture has been removed. Popcorn ceilings conceal imperfections that will become visible once the surface is uncovered. Oftentimes, we’ll find damaged drywall tape, visible joints and screws. These will all need to be repaired as well. Because of this, we always plan to skim coat the ceiling with a layer of mud (joint compound) to achieve a beautifully flat and uniform surface.
Step 4: Sand, Prime, and Paint
Once all repair work is done and properly skim-coated, simply wait for everything to dry and check to make sure more mud isn’t needed in places. The next step is to sand the entire surface that has been mudded. Keep the sanding to a minimum so that you don’t damage areas or create more gouges. It can be tough working overhead on a ceiling, but practice ultimately makes perfect.
After sanding it’s essential that the ceiling is then primed. Joint compound and also unpainted drywall is extremely porous. Any paint applied without a primer will just get absorbed. You’ll end up using A LOT of coats and still have a very ugly ceiling. A good quality PVA primer should do the trick!
Lastly, once the primer has been applied and is dry, it’s time to paint. Ceiling paint is pretty standard (unless you don’t want bright white ceilings). We usually recommend Sherwin-Williams Eminence High-Performance Ceiling Paint. It applies easily and offers a fresh and beautifully smooth finish.
Alternative Option: Covering Popcorn Ceilings
If scraping away the texture on your ceilings sounds like too much of a mess (and you should definitely prepare for a mess), or your ceilings are particularly damaged, it may be easier to cover the whole thing up if you’re planning to DIY this project. Installing a new layer of drywall is possible if you want a fresh start. However, that option isn’t at all easier or even more cost-effective.
Instead, for a quick fix, you can find some pretty convincing faux tin tiles that can be attached to the ceiling with construction adhesive. If you favor wood paneling, you can attach a bead board or shiplap directly to the ceiling with a nail gun. Just don’t forget, with highly textured ceilings, you’ll need to install furring strips and then attach the paneling to the strips to avoid an uneven look.
Overall, if you want to say goodbye to your ugly popcorn and really retain your home’s resale value, removing the texture once and for all is your best bet. Let the experts at Zoe’s ProEdge Painting tackle the project for you! We’ve removed so much popcorn I’m almost convinced we could do the job in our sleep. Not that we recommend sleeping on the job, but you get the idea!
Call us today for more expert advice or to schedule your popcorn removal project. We’re more than happy to help!